Material Monday: What 50 Denim Test Pieces Taught Me About Laser Engraving
I've burned through more denim than I care to admit. Literally.
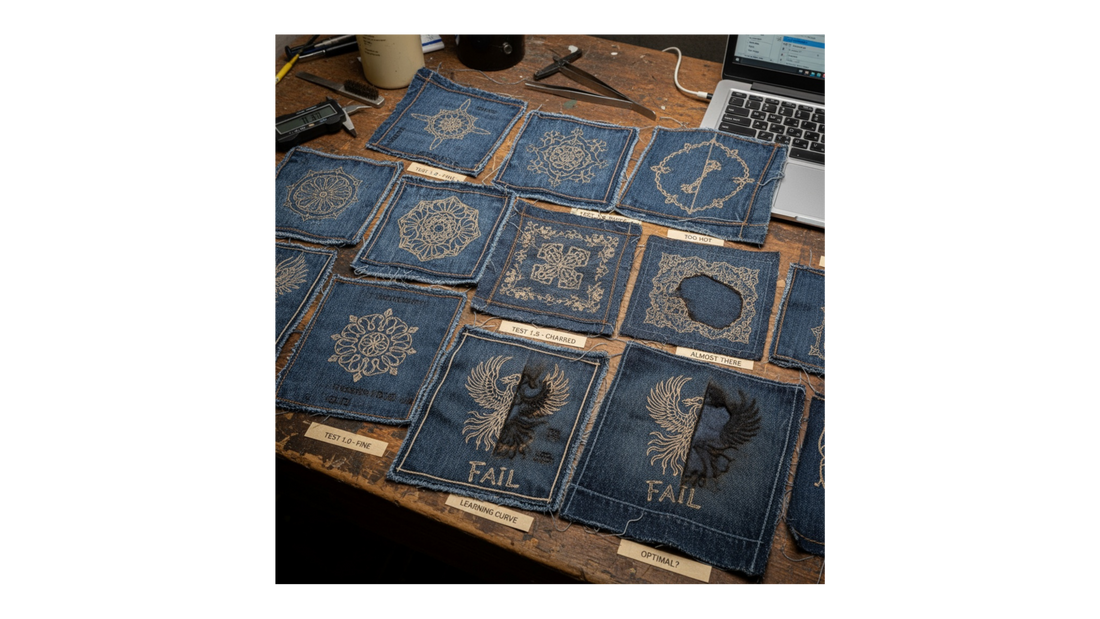
Last week alone, I torched three pairs of jeans trying to dial in the perfect laser settings for our upcoming drop. But here's the thing—every mistake taught me something valuable, and I'm sharing all of it with you today.
The Challenge Nobody Talks About
Denim looks simple on paper. You've got fabric, a laser, and a design. Boom—engraved masterpiece, right?
Wrong.
Denim has layers. It has varying thickness. Different weaves. And if your power settings are even slightly off, you get either a faint ghost of a design or a charred mess that smells like a tire fire.
When I first started testing with my Creat Lumos, I ran it like I would on wood. That was mistake number one.
What Actually Works (After Wasting $200 in Materials)
Power Settings That Don't Destroy Everything
Start at 40-50% power and 80-90% speed. Denim needs a lighter touch than you'd think. The fabric scorches fast, and once it's burned, there's no going back.
I learned this the hard way when I ran my first test at 70% power. The result? A hole straight through the fabric and a design that looked like it survived a house fire.
Focus Distance Is Everything
Get this wrong and your design blurs into an unrecognizable mess. I use a focus tool every single time now—no shortcuts, no eyeballing it.
The sweet spot is about 0.5mm above the fabric surface. Consistent focus = consistent results.
Design Prep Makes or Breaks You
Thin lines work way better than thick fills. Fills create hot spots and uneven burning. I've started converting my designs to outline-heavy graphics in Adobe Illustrator, which gives that clean, precise look we're going for with our streetwear aesthetic.
Think minimalist line work, hidden symbolism, urban narrative—not chunky filled shapes.
The Frame Trick That Changed Everything
Stretching the denim tight on a frame prevents puckering and gives you a flat, even surface. Game changer.
I use a simple wooden frame with clamps—nothing fancy. Just needs to keep the fabric taut while the laser does its thing.
The Real Talk
I wasted about $200 worth of materials getting here. Jeans, test fabric, time. But that's the maker life. You iterate, you fail, you learn.
The slider issue on my Lumos has been slowing me down (still working on that), but it's forced me to be more intentional about each cut. Sometimes limitations push you to be better.
What surprised me most? The community. I posted a question in a laser engraving forum about denim, and three different makers jumped in with their settings and tips within an hour.
That's the energy I want to build at CRAFTURE—makers helping makers level up.
What's Coming Next
I'm testing leather next week. The feedback I've been getting suggests our 420/710 culture audience is hungry for custom dab rig cases with engraved designs. Leather is a whole different beast, but I'm going in armed with what I learned from denim.
I'm also working on a gaming culture collection—think retro console graphics, pixel art, controller schematics engraved on wood and denim. That 18-45 demographic loves this stuff, and I'm here for it.
Your Turn
Have you worked with denim and laser engraving? What settings work for you? Any materials you want to see me test next?
Drop your experience in the comments—I'm always learning, and I'd love to hear what's worked (or spectacularly failed) for you.
If you're thinking about getting into laser engraving, this is the real, unfiltered version of the process. It's messy, it's expensive, and it's incredibly rewarding when you finally nail it.
Follow the Journey
Want to see these designs in action? Follow @crafturefoundry on Instagram and TikTok for behind-the-scenes laser tests, failed experiments, and sneak peeks of our next drop.
And if you want to be notified when our laser-engraved denim collection launches, sign up for our email list below. You'll get early access to drops, maker tips, and the occasional story about me accidentally setting things on fire.
Next week: Leather engraving experiments and why I'm never using the same settings twice.